Quick Links
Make your smartphone photography more interesting by learning some of the coolest effects. In this guide, I’ll share nine types of photography effects you should learn and include example pictures for each. You’ll also discover tips to make them work better.
1Black and White Photography
Danny Maiorca/MUO
Black and white photography is one of the most intriguing types of smartphone photography to learn. I think it works particularly well with smartphones because desaturating your pictures (while adding a bit of contrast) can counter the flat look that sometimes accompanies images taken on your phone.
You can desaturate your images in multiple ways. Many camera apps will let you choose a filter that takes the color out of your pictures. On top of that, you can use filters on Instagram and other social media platforms. Alternatively, apps like VSCO and Lightroom have presets that let you make your images black and white.

Check out thiscomplete black and white photography beginner’s guideto learn more about this kind of photography and pick up some tips to take better pictures.
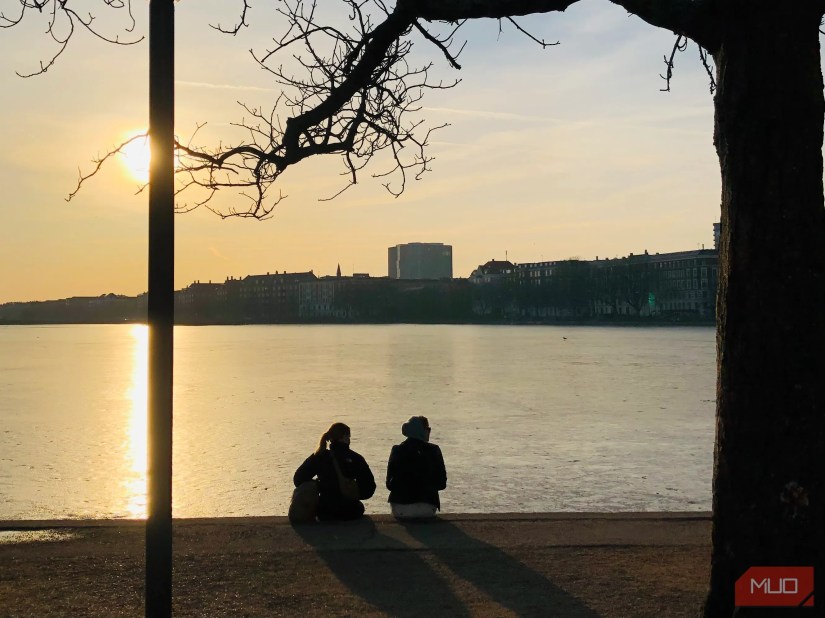
You might think that bokeh only relates to using external lights, but this isn’t the case. Bokeh can involve blurring out other backgrounds, such as trees. If your smartphone has a function that lets you control the aperture, such as Aperture Mode on iOS, you’ve got the option to experiment with this effect and see what you can come up with.

When taking bokeh photos, think about how your background interacts with your subject. For example, you can make your subject really stand out byapplying color theory to your creative projects. There are severalways to create bokeh effects with your camerathat also apply to smartphones, such as getting closer to your subject.
3Film-Style Photography
It’s somewhat ironic that I’ve spent thousands of dollars to try and create the same effects that a disposable camera can create, but film-style photography has quickly become my favorite style of photography nonetheless. You can create this effect on your smartphone in several ways.
VSCO and Lightroom are two choices, but I also like the DAZE CAM app (the downside is that it’s available only on iOS).

Download:DAZE CAM foriOS(Free, in-app purchases available)
When creating film-style photos, you can play around with each of the following:

There are several otherways you’re able to create Polaroid and film-style photos.
4High-Contrast Photography
Ever since I first discovered photography, I’ve loved the high-contrast style. Admittedly, some of my early iterations leave a lot to be desired, but it’s now something that I’ve become quite proficient in. High-contrast photography is normally something that you do in post-production, and it’s quite easy to boost the contrast slider in whichever photo editing software you use.
High-contrast photography works best on overcast days and in scenes with a lot of color. you may learn more about the genre in thisfull high-contrast photography guide.
5Lens Flare
Lens flare is quite difficult to achieve on a smartphone, but it’s not impossible by any stretch. You can create this effect when pointing your smartphone at the sun or a strong lighting source. Some of the difficulties associated with this include the rest of your picture lacking detail, and the light source not producing flare if you tap on it.
I recommend experimenting with lens flare during periods of softer light, such as at golden hour. I’ve never managed to get good results when trying lens flare during the day, though of course, your mileage may vary. You can learn more about this effect, and subsequently take better pictures, in thisguide to lens flare in photography.
6Backlighting
Backlighting is exactly as the name suggests; it’s when light meets your subject from behind. However, the light source can be on either side as well. You can use backlighting to create silhouettes and also make your subject look more dramatic. This lighting method is commonly used in action movies, and you’ll also notice it in various photography genres like portrait photography.
You can use backlighting on people, animals, buildings, and many other subjects. The result you’re aiming for will determine how strong the light source should be, but this works particularly well when you have soft lighting. Thisguide to backlighting in photographygives you all the info you need before you head out.
7Shooting Through Objects
Much of photography is about using your surroundings to their maximum advantage. If you want to instantly improve your composition, I suggest taking pictures through subjects—such as trees and doorways. You can also use buildings and alleyways to add another layer to your photos.
Photographing through objects works particularly well in urban settings. For example, one of my favorite things to do is wait for a person to walk into my scene and create a silhouette of them in my shot. This works especially well in arches and other similar areas. you’re able to also get creative by looking for gaps in bridges and similar objects.
8High-Saturation Photography
High-saturation photography is very easy to overdo, and I have mentioned that this is anoverused effect in photography, but it looks really good if you know when to use it. I like using high-saturation effects when I take pictures around golden hour because, in my opinion, smartphones are nowhere near as good as mirrorless and DSLR cameras at capturing colors around those times.
You can increase the saturation in several programs, including Lightroom, Photoshop Express, VSCO, Canva, and Apple Photos. I would not suggest using high-saturation photography on sunny days as it often makes your picture look more like a painting.
9Reflections
Reflections automatically add another dimension to your pictures, and you can use them in all conditions. For example, if it has just rained outside, reflections can look pretty cool in puddles. However, I also regularly go to lakes and harbors and use what’s available there.
When photographing reflections, it’s a good idea to look for subjects that look interesting anyway. My favorite thing to do is find reflections of colorful buildings and factor those into my shots. What looks interesting is entirely subjective, so think about what you normally like. We’ve got a full guide onwhat reflection photography is (and how to get the best results)for further reading.
If you’re new to smartphone photography or simply bored of your shots, try these effects and watch your photos come alive.
